Dehydrating apples at home is easy and they are a great snack to keep on hand. You really don’t need a lot of equipment to dehydrate apples, in fact you can do it right in your kitchen’s oven. But I’ll go over 3 methods for dehydrating apples at home and you choose the one that works best for you! This article will cover making dehydrator apples in a food dehydrator, your oven or a Sun Oven.
Dehydrating Apples at Home
If you’ve never dried or dehydrated food, dehydrating apples is a good place to start. You won’t need a lot of ingredients and the steps are easy to follow.
Is it true that an apple a day keeps the doctor away?

Well I’m not a doctor or a nutritionist but apples do have some pretty awesome health benefits. According to my research apples can help with digestion, reduce pressure in blood vessels and are a great source of Vitamin C. But you’ll have to decide for yourself if the old saying is true.
Are dried apples as healthy as non-dried apples?
Well, they do offer you the same vitamins as fresh apples but less fiber per serving. It may take more dehydrated apples to fill you up so be careful, this healthy snack can be packed with a lot of natural sugars! Like most things, a little goes a long way.
Are dehydrated foods good for you?
It is probably better to choose the fresh variety when available but dried apples and other dried foods are portable and convenient. I love when I make my own dehydrated apples and snacks, I control the ingredients!
I like to take dehydrated foods that I’ve made on long walks and hikes too.
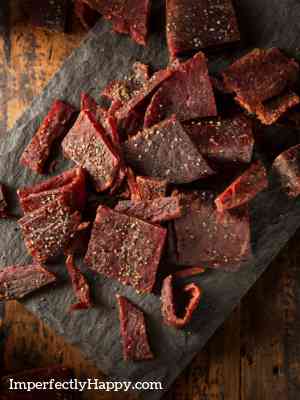
In my opinion dried apples, homemade beef jerky or any dehydrated snack that you make at home will certainly be better than anything from a drive through window or wrapper!
Check out this ground beef version of jerky
How to Dehydrate Ground Beef Jerky
How to save lots of apples at home?
If you find a great deal on apples at your farmer’s market or wholesale store then dehydrating apples can be a great way to preserve a lot of apples at one time. Then you can eat and enjoy the apples for a lot longer! Of course canning apples is another great option if you have the space for mason jars in your pantry. See Canning Apples in Syrup and How to Can Apples for Baking
Tips for Dehydrating Apples
- Use a mandolin slicer to get even slices for all your apples.
- When I dehydrate apples I like to peel them, but you can leave the peel on. If you are going to dehydrate apples regularly I would recommend investing in a device to peel and core them apples for you. See Apple Peeler / Corer.
- You can use any variety of apple but I have found that Fuji, Gala, Honeycrisp and Granny Smith are my favorites.
- No sugar or sweeteners needed!
- Pre-soaking your apple slices in lemon juice will preserve the color better but it is optional.
- It is important to make sure the apples are completely dehydrated or they can quickly mold.
- You can bump up the flavor by sprinkling a little cinnamon on the slices before drying them.
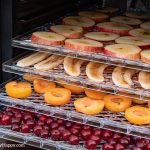
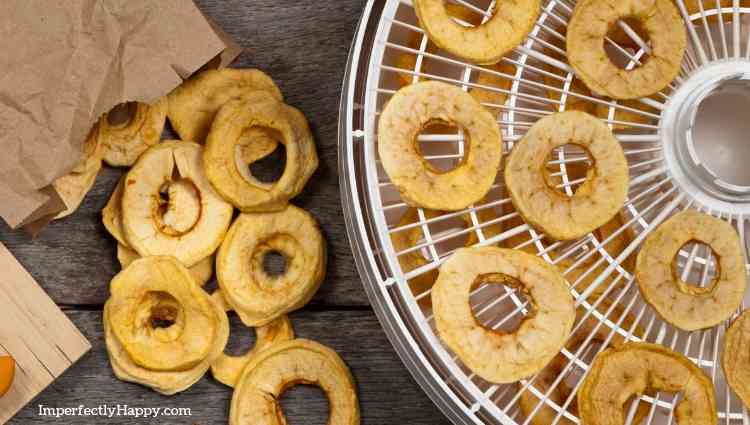
How to Dry Apples in a Dehydrator
This is the most common way to dry apples, using a dehydrator and dehydrator trays. I have been using my Nesco Food Dehydrator for years but I do think it lacks the power of the Excalibur Food Dehydrator. If your budget allows, go for the Excalibur!
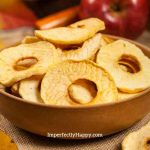
Easy Homemade Dehydrated Apples for Snacks
Ingredients
- 4 lbs of fresh apples peeled and cored
- 1/4 cup of lemon juice + 1 quart of water optional
- 3 – 4 tablespoons of cinnamon optional
Instructions
-
If you haven’t already was, peel and core your apples.
-
Using a mandolin slicer make thin even slices of your apples (1/4 inch)
-
As you slice your apples place them in the lemon juice and water combination to keep them from browning. Don’t leave them in more than 5 minutes. (optional)
-
Shake off any access liquid before drying.
-
Sprinkle the slices with cinnamon just before placing them in the dehydrator (optional)
-
As you place your apple rings on your dehydrator trays make sure you are not crowding them – the air has to circulate to dry them properly.
-
Dehydrate at 135°F for 6 to 8 hours.
-
Apples are done when there is no moisture inside or out. They’ll feel dry to the touch and leathery. Test the inside by cutting one slice open to dryness. It should be like a dry sponge.
-
Let the apples sit and come to room temperature before storing.
-
Store in an air-tight container, food storage bags or mason jar.
-
Keep your dehydrated apples in a cool, dark area when storing.
-
They should stay good for several months, though we’ve never had to keep them that long because they get eaten fast!
How to Make Dehydrated Apples in an Oven
If a dehydrator is not in the budget right now or not available to you, you can make dried apples in your kitchen oven. You’ll follow the same directions through number 5 and then changes will need to be made.
Easy Homemade Dehydrated Apples From Your Oven
Make dehydrated apples in your oven
Ingredients
- 4 lbs of fresh apples peeled and cored
- 1/4 cup of lemon juice + 1 quart of water optional
- 3 – 4 tablespoons of cinnamon optional
Instructions
-
If you haven’t already was, peel and core your apples.
-
Using a mandolin slicer make thin even slices of your apples (1/4 inch)
-
As you slice your apples place them in the lemon juice and water combination to keep them from browning. Don’t leave them in more than 5 minutes. (optional)
-
Shake off any access liquid before drying.
-
Sprinkle the slices with cinnamon just before placing them in the oven (optional)
-
Place the apple slices on a wire baking sheet and place in the oven. I do not recommend putting them directly on your oven racks unless you give them a really good cleaning first.
-
Set on your oven’s lowest baking temperature and prop the oven door open to allow air to circulate.
-
Baking times will vary on your lowest temp, humidity, etc. But start checking at 5 hours in; they make take up to 8 hours.
-
Apples are done when there is no moisture inside or out. They’ll feel dry to the touch and leathery. Test the inside by cutting one slice open to dryness. It should be like a dry sponge.
-
Let the apples sit and come to room temperature before storing.
-
Store in an air-tight container, food storage bags or mason jar.
-
Keep your dehydrated apples in a cool, dark area when storing.
-
They should stay good for several months, though we’ve never had to keep them that long because they get eaten fast!
Dehydrating Apples in a Sun Oven
You can dehydrate apples in any solar oven but I think the Sun Oven is the best on the market. I use it to dehydrate, bake and roast! I love that this method uses no electricity too! Harness the power of the sun for cooking!
You’ll follow the first 5 basic steps in my recipe before using your dehydrating racks in the Sun Oven. This video explains dehydrating in the Sun Oven perfectly.
Recipes that Use Dehydrated Apples
Did you know you can also use dehydrated apples in some delicious recipes? Here are a few ideas for you!
- Cinnamon Baked Oatmeal with Dried Apples and Cranberries
- Add chopped dehydrated apples to your salad for a bit of sweetness.
- Dried Apple Pie Recipe
- Garnish a hot mug of cider with a ring of dehydrated apple.
- Apple Spice Cake with Dried Apples
- Mixed chopped dried apples with your favorite nut/s for a sweet and salty snack mix.
- Homemade Dried Apple Granola Bars Recipe
How do you re-hydrated dried apples?
- You’ll need a large bowl with enough to hold the dehydrated apples.
- Fill the bowl up about 1/2 way with room temperature water (allow it to cool down if needed).
- Put your dried apples slices in the room temp water and make sure they are all under the water.
- Allow them to soak for about 30 minutes.
What are the best dried foods to make at home?
Well, of course, I think apples are the best dried food to make! Other dehydrated foods I like to make at home? I’d recommend bananas, beef jerky (homemade can have a lot less sugar), tomatoes, mushrooms, garlic and potatoes.