Bell peppers are a delightful addition to any backyard garden. Their vibrant colors and sweet flavor make them a favorite among gardeners and cooks alike. Growing your own bell peppers can be a rewarding experience, allowing you to enjoy fresh, organic produce right from your backyard. In this guide, we’ll walk you through the steps to successfully grow bell peppers, from planting to harvest.

Choosing the Right Variety
Before you start planting, it’s essential to choose the right variety of bell peppers. Bell peppers come in various colors and flavors. Here are some unique and delicious varieties to consider:
- Chocolate Bell: Known for its rich, brown color and sweet taste.
- Orange King: A bright orange pepper that is both sweet and juicy.
- Sunbright Yellow: Adds a vibrant yellow color to your garden and has a crisp texture.
- Yolo Wonder: A classic variety that starts green and turns red when mature.
- White Cloud: A unique variety with a creamy white color and mild flavor.
Consider your climate and growing conditions when selecting a variety. Some bell peppers are better suited to cooler climates, while others thrive in warmer conditions.
Preparing the Soil
Bell peppers need well-draining, fertile soil to grow well. Start by choosing a sunny spot in your backyard that receives at least six to eight hours of sunlight daily. Here’s how to prepare your soil:
- Test the Soil: Use a soil testing kit to check the pH level of your soil. Bell peppers prefer a pH range of 6.0 to 6.8.
- Amend the Soil: If your soil is too acidic or alkaline, amend it accordingly. Add compost or well-rotted manure to enrich the soil with organic matter.
Awesome Soil Amendments for Your Organic Vegetable Garden - Till the Soil: Loosen the soil to a depth of 12-15 inches to ensure good root penetration and drainage.
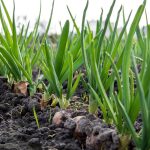
Starting Seeds Indoors
Starting bell pepper seeds indoors can give your plants a head start, especially if you live in a region with a short growing season. Here’s how to do it:
- Timing: Start seeds indoors 8-10 weeks before the last expected frost date in your area.
- Seed Trays: Fill seed trays or small pots with a seed-starting mix.
- Sow Seeds: Plant the seeds about 1/4 inch deep and cover lightly with soil.
- Watering: Keep the soil moist but not waterlogged.
- Light: Place the trays in a warm, sunny spot or under grow lights.
Once the seedlings have two to three sets of true leaves, they are ready for transplanting.
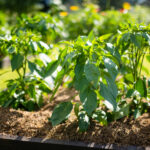
Transplanting Seedlings
When the danger of frost has passed and the soil has warmed up, it’s time to transplant your bell pepper seedlings into the garden:
- Hardening Off: Gradually acclimate the seedlings to outdoor conditions by placing them outside for a few hours each day, increasing the time gradually over a week.
- Planting: Space the seedlings 18-24 inches apart in rows that are 24-36 inches apart.
- Depth: Plant the seedlings at the same depth they were growing in their pots.
- Watering: Water thoroughly after planting to help the roots establish.

Caring for Your Bell Peppers
Bell peppers require consistent care throughout the growing season. Here are some tips to ensure a healthy and productive garden:
- Watering: Keep the soil consistently moist, but avoid overwatering. Mulching can help retain soil moisture and suppress weeds.
- Fertilizing: Use a balanced fertilizer (10-10-10) every 4-6 weeks. Avoid high-nitrogen fertilizers, which can promote leaf growth at the expense of fruit production.
- Pruning: Remove any lower leaves that touch the ground to prevent disease. Pinch off the first flowers to encourage more branching and fruit production.
- Staking: Use stakes or cages to support the plants, especially as they start to produce heavy fruit.
Dealing with Pests and Diseases
Bell peppers can be susceptible to pests and diseases. Here’s how to manage them:
- Aphids: Spray plants with a mixture of water and mild soap to deter aphids.
- Cutworms: Place collars around the base of seedlings to protect them from cutworms.
- Blossom End Rot: Ensure consistent watering and adequate calcium in the soil to prevent this condition.
- Fungal Diseases: Use fungicides as needed and avoid overhead watering to reduce the risk of fungal infections.
Harvesting Bell Peppers
The most rewarding part of growing bell peppers is the harvest. Here’s how to know when your peppers are ready:
- Color: Bell peppers can be harvested at any stage, but they are sweetest when fully ripe. Green peppers will turn red, yellow, orange, brown, or white when mature, depending on the variety.
- Size: Harvest when the peppers reach the desired size for the variety you are growing.
- Cutting: Use sharp scissors or pruning shears to cut the peppers from the plant, leaving a short stem attached.
Storing and Using Bell Peppers
Once harvested, bell peppers can be stored in the refrigerator for up to two weeks. They can be used in a variety of dishes, from salads and stir-fries to stuffed peppers and salsas. For longer storage, consider freezing or drying your bell peppers.
Growing Bell Peppers at Home
Growing bell peppers in your backyard can be a fulfilling and productive endeavor. With the right preparation, care, and attention to detail, you can enjoy a bountiful harvest of these colorful and nutritious vegetables. Whether you’re a seasoned gardener or a beginner, following these steps will help you cultivate healthy, vibrant bell pepper plants in your own backyard. Happy gardening!